

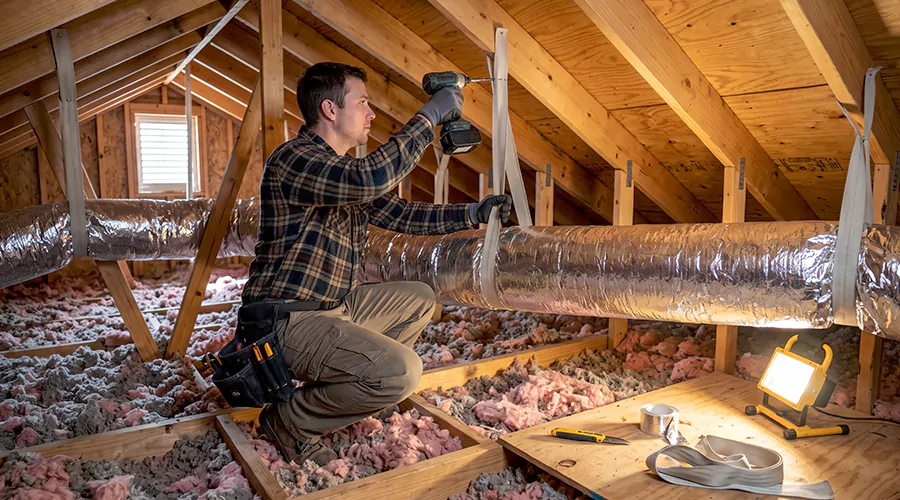
To hang flexible ductwork, attach wide support straps or approved saddles as part of proper air duct installation to suitable building framing, space horizontal supports no more than four feet apart, and limit sag to approximately half an inch per foot between supports. Support straps should generally be at least 1.5 inches wide and should hold the duct without compressing its insulation or inner liner. Additional support is needed near bends, connections, and changes in elevation.
Flexible ductwork is commonly installed in residential attics, crawlspaces, and other spaces where rigid metal ducts would be difficult to route. Its bendable construction allows installers to connect HVAC trunks to ceiling registers and other outlets. However, the material is more vulnerable to sagging and crushing than rigid ductwork.
An insulated flexible duct usually contains an inner air passage supported by a spiral wire, a surrounding insulation blanket, and an exterior protective jacket. When the duct is hung incorrectly, narrow straps can squeeze the insulation and distort the inner passage. Long unsupported sections can also sag and create unnecessary resistance to airflow.
Proper hanging is therefore part of the HVAC system's performance, not simply a way to keep the duct off the floor. A well-supported duct maintains its intended diameter and prevents excessive strain on its connections. The installation should follow the manufacturer's instructions and applicable mechanical requirements.
Why Does Flexible Ductwork Need Proper Support?
Flexible ductwork does not maintain its shape as rigidly as sheet metal. Without sufficient support, the duct can sag between connection points or form sharp bends around framing. These restrictions can reduce the amount of heated or cooled air reaching a room.
Support also protects the connections at trunks, junction boxes, and register boots. An unsupported duct may pull away from a fitting under its own weight. This can create air leakage even when the connection was originally secured correctly.
The U.S. Department of Energy's Building America guidance recommends that flexible ducts be supported at regular intervals without pinching or compressing the material. The guidance also emphasizes supporting branches near fittings and bends. Correct hanging helps the duct deliver air while protecting its insulation and exterior jacket.
How Far Apart Should Flexible Duct Supports Be?
Horizontal flexible duct supports should generally be installed no more than four feet apart. Department of Energy guidance recommends support straps at least 1.5 inches wide and limits allowable sag to approximately half an inch per linear foot between supports. The specific duct manufacturer's instructions and applicable local code may require additional support.
The distance is measured along the duct route between support points. A branch should not be allowed to sag deeply simply because the hangers are within the maximum spacing. Additional support may be needed where the duct is heavy or changes direction.
| Flexible Duct Support Requirement | Typical Department of Energy Guidance |
|---|---|
| Maximum horizontal support spacing | 4 feet |
| Minimum strap width | 1.5 inches |
| Maximum sag between supports | 0.5 inch per foot |
| Maximum typical vertical support spacing | 6 feet |
| Support at rigid connections | Required as appropriate |
| Support around bends | Before and after bends |
| Support for register and junction boxes | Independently supported as appropriate |
| Compression at straps | Avoid restricting liner or insulation |
These are typical guidance values rather than a substitute for product-specific requirements. Some flexible duct products may need closer support or a particular hanging system. The manufacturer's instructions should be reviewed before installation.
How Much Sag Is Allowed in Flexible Ductwork?
Department of Energy guidance recommends limiting sag between support points to no more than half an inch per foot. This means a duct spanning four feet between supports should not sag more than approximately two inches at its lowest point. The requirement helps prevent severe drooping that can interfere with airflow.
A small amount of natural curvature may be acceptable, but deep loops are not. Flexible ducts perform better when appropriately extended along their intended routes. Excess material should be removed or rerouted rather than allowed to hang in large unsupported bends.
The installation should also avoid squeezing the duct at the hanger itself. A branch can meet the maximum sag requirement while still being restricted by a narrow strap. Both support spacing and strap shape matter.
What Is the Best Material for Hanging Flexible Ductwork?
Wide woven duct support strapping is commonly used to suspend insulated flexible ducts. Other approved support systems include saddles and manufacturer-provided hanging assemblies. The support should distribute the duct's weight without crushing the inner liner or insulation.
| Support Material | Typical Suitability | Important Consideration |
|---|---|---|
| Wide woven duct strap | Common residential horizontal support | At least 1.5 inches wide under DOE guidance |
| Approved metal or rigid saddle | Supports duct at selected locations | Must avoid sharp contact or compression |
| Manufacturer-provided suspension system | Suitable where specifically approved | Follow product instructions |
| Wide nonabrasive support band | May be suitable when rated and approved | Must maintain duct shape |
| Narrow wire | Generally unsuitable as sole support | Can cut or compress insulation |
| Thin cord or string | Not recommended | Concentrates pressure |
| Cable tie around insulated duct | Not recommended as a hanging saddle | Can crush the air passage |
| Structural framing surface | Can support some approved installations | Duct must remain protected from damage |
The main purpose is to support the duct's entire insulated diameter rather than press against one narrow point. A saddle can spread the load over a larger area. The support material should also be durable under the installation conditions.
Ordinary household rope or thin electrical wire should not be substituted for approved support systems. Such materials may seem strong enough to hold the duct but can deform it over time.
What Tools and Materials Do You Need?
Hanging flexible ducts generally requires simple fastening and measurement tools, but the support arrangement should still follow an approved plan. The installer needs suitable building attachment points as well as straps or saddles. The full insulated diameter and duct route should be considered before choosing support lengths.
| Tool or Material | Purpose |
|---|---|
| Approved wide support straps | Holds the duct without compression |
| Suitable duct saddles | Distributes weight at support points |
| Appropriate framing fasteners | Secures supports to approved structural members |
| Measuring tape | Checks support spacing and duct routing |
| Suitable driver or fastening tool | Installs approved fasteners |
| Flashlight or work lighting | Helps inspect the duct route |
| Protective gloves | Reduces handling injuries |
| Eye protection | Protects during overhead work |
| Appropriate attic access equipment | Supports safe movement |
| Replacement duct jacket repair materials | Repairs approved localized covering damage |
| Duct layout or installation plan | Identifies the intended support arrangement |
The type and length of fasteners depend on the building framing and the support product. The installer should not attach hangers to ordinary ceiling drywall or unknown weak surfaces. Suitable structural attachment points are necessary for stable support.
How to Hang Flexible Ductwork Step by Step?
The following steps describe how properly trained installers hang a typical insulated flexible duct branch in an attic or similar location. The method should be adjusted for the specific duct product and installation environment. Do not enter unsafe attics or crawlspaces to perform the work without suitable training and access.
Step 1. Inspect the Existing Duct Route
Identify where the flexible duct starts and ends. Examine the route between the rigid trunk, junction box, or plenum and the register boot. Look for sagging, sharp bends, compressed sections, and damaged insulation.
A duct that is already permanently crushed may not be restored simply by adding hangers. The inner liner should be inspected before repositioning the material. Replacement may be necessary when the passage has substantial structural damage.
The inspection should also establish whether the existing connections remain secure. A branch that has pulled away from a fitting should be properly reconnected before hanging adjustments are finalized.
Step 2. Evaluate the Work Area for Hazards
Check the attic, crawlspace, or basement for electrical wiring, unstable access surfaces, moisture, and other obstacles. Attic ceiling drywall is not designed to support workers. Crawlspaces containing standing water or exposed electrical hazards should not be entered until conditions have been assessed.
The installer should identify safe routes to the intended fastening locations. Structural trusses and framing members should not be cut or modified to create support points. Hangers should use suitable existing structural locations or approved supporting assemblies.
Older insulation may also require specialized assessment when hazardous material is suspected. Avoid disturbing unfamiliar insulation during ordinary duct support work.
Step 3. Confirm the Duct Size and Intended Route
Check the nominal duct diameter and make sure the installed route is appropriate for its airflow requirements. A flexible duct cannot be made correctly sized by pulling it tightly between two connections. Its inner passage must maintain the intended diameter throughout the run.
The route should be as direct as practical and contain gentle bends. The Department of Energy recommends avoiding excessive flex duct length because compression and sagging can increase airflow resistance. If the branch contains large loops, an appropriately shortened or redesigned run may be necessary.
Step 4. Identify Suitable Framing Attachment Points
Locate the building members or approved support systems that can carry the hanging straps. The fasteners must attach to structurally suitable points. Unsupported ceiling drywall and unrelated utilities should not carry duct weight.
Attic framing layouts can vary between houses. The best hanger location may be slightly offset from the duct's route. In that case, a properly designed support arrangement should distribute the weight without pulling the duct sideways into a sharp bend.
Do not drill or nail blindly into areas containing concealed wiring or plumbing.
Step 5. Plan the Support Spacing
Measure the duct route and mark support points no more than four feet apart for typical horizontal flexible duct installation. Identify additional locations near connections and changes in direction. The maximum spacing should be reduced when needed to prevent excessive sagging.
Support spacing should account for the actual duct route, not only the straight-line distance between its endpoints. A branch crossing several framing bays may need support at different positions along the route. The goal is a stable duct with limited curvature between hangers.
Step 6. Select the Correct Strap Width
Choose approved hanging straps that are at least 1.5 inches wide under Department of Energy guidance. The strap should be wide enough to distribute the duct's weight rather than pinch the insulation. Manufacturer-approved saddles may also be used.
Avoid narrow wire, cord, or tightly fitted ties as the primary suspension method. Concentrated pressure can distort the duct even when the material appears to remain supported. The support should cradle the duct rather than squeeze it.
Step 7. Prepare the First Support
Position the first support near the duct connection according to the planned route. The purpose is to prevent the weight of the branch from pulling downward on its rigid collar. The support should hold the duct in a stable position without changing its shape.
A branch should not leave a connection and immediately turn sharply downward. The Department of Energy recommends allowing the duct to extend straight for at least a distance equal to its radius before a bend, with support to maintain that alignment. This reduces the chance of the liner being pinched against the metal collar.
Step 8. Secure the Support to Framing
Attach the strap or saddle to suitable building structure using the approved fastening method. The connection should hold the expected duct weight without allowing the support to shift. Fasteners should be appropriate for the framing material.
The strap should not be tightened around the duct like a belt. It needs to carry the weight while preserving the insulated diameter. The installer should inspect the duct shape immediately after positioning it.
Step 9. Lift the Duct Into Position
Carefully raise the flexible duct to the intended support height. Support its weight along the section being moved rather than pulling it from one end. This helps protect the inner liner and existing connections.
The duct should settle naturally into the wide strap or saddle. If the support creates a visible indentation, the hanging arrangement may be too narrow or tight. Adjust it before continuing.
A properly hung duct retains a smooth passage instead of developing an abrupt restriction at each hanger.
Step 10. Install the Remaining Horizontal Supports
Continue installing straps along the duct route with no more than four feet between support points, subject to more restrictive product requirements. Keep sag within the recommended limit. Check the shape of the duct between each pair of supports as work progresses.
The supports should maintain a reasonably consistent route. Uneven hanger heights can create unnecessary waves and bends. The goal is not to pull the duct into a perfectly rigid straight line but to avoid excessive drooping and compression.
Step 11. Add Support Before and After Bends
Install additional support around meaningful changes in direction. The Department of Energy specifically recommends supporting flexible ducts before and after bends to reduce the chance of collapse. A sharp unsupported turn can substantially restrict airflow.
A bend should follow a gentle curve suitable for the duct diameter. If surrounding framing does not allow that curve, the installer may need to change the route or use a suitable rigid elbow. Adding more straps cannot correct a bend that is physically too tight.
Step 12. Support Connection Points
Check the supports near rigid duct trunks, plenums, register boots, and junction boxes. The flexible duct should not place excessive strain on any of these fittings. The Department of Energy recommends suitable support where flexible ducts connect to rigid metal components.
Large junction boxes and register boots may also require their own supports. They should not hang from the flexible duct itself. Each component needs an arrangement appropriate for its weight and construction.
Step 13. Inspect the Inner Passage for Compression
Look along the entire duct and identify places where the outer jacket appears flattened or sharply indented. These may indicate compression of the insulation or liner. A support that is too tight should be adjusted.
The duct should maintain its intended shape at corners and crossings. If it touches framing, make sure the contact does not crush the passage or damage the jacket. A protective saddle or different support position may be appropriate.
Step 14. Check the Insulation and Exterior Jacket
Inspect the outer jacket for tears or gaps caused during hanging. The insulation should remain dry and reasonably continuous around the duct. Damage to the protective jacket can expose insulation and create moisture concerns in unconditioned spaces.
Small localized exterior damage may sometimes be repaired using compatible approved materials. More extensive damage or wet insulation may require replacement of the affected duct section. The correct approach depends on the actual condition.
Step 15. Check the Connections After Hanging
Return to both ends of the branch and inspect their mechanical connections. Moving the duct into a new position can place force on existing collars. Confirm that the inner liners remain properly attached and that sealing materials have not separated.
Where a connection is loose, it should be repaired using the approved inner-liner fastening and sealing procedure. The exterior jacket alone is not sufficient to hold the air-carrying connection.
Step 16. Check Airflow and Leakage
After supports and connections are restored, the HVAC system can be operated according to its instructions. Check whether airflow at the served register has improved or changed unexpectedly. A professional may measure airflow and duct leakage to verify the result.
A duct that looks properly supported can still contain restrictions or leaks. Testing helps identify problems before the work is considered complete. This is particularly useful when the branch previously supplied very weak airflow.
How to Hang Flexible Ductwork in an Attic?
Attics are common locations for suspended flexible ducts. The installer should identify approved framing points and create a support arrangement that avoids compressing insulation. The duct should remain accessible for inspection where practical.
The attic layout may include trusses, joists, and other framing that provide potential attachment locations. However, they should not be cut or weakened during installation. Fastening should use suitable methods that preserve the structure.
High temperatures and limited walking surfaces also affect installation safety. Workers need appropriate access and should avoid placing weight on ceiling drywall. Ducts should not obstruct attic ventilation openings or necessary maintenance pathways.
If attic floor insulation is disturbed while supports are installed, restore it appropriately. A properly supported duct can still lose conditioned air or experience heat transfer problems when its joints or insulation remain damaged.
How to Hang Flexible Ductwork in a Crawlspace?
Crawlspace ductwork may be suspended beneath floor framing to keep it clear of moisture and ground contact. The supports should maintain the duct's shape without pulling against its connections. Limited clearance can make proper routing more difficult.
A flexible branch should not hang low enough to contact standing water. Moisture can damage insulation and surrounding materials. The source of water should be corrected rather than relying only on higher hangers.
Supports should attach to suitable framing, not plumbing pipes or electrical conduit. The duct should also remain protected from physical damage during future crawlspace maintenance.
A crawlspace with extremely limited clearance may require a different duct material or route. Compressing flexible duct between the ground and floor framing is not an acceptable way to make it fit.
How to Hang Flexible Ductwork Vertically?
Vertical flexible duct sections need support that prevents their weight from pulling against the upper connection. Department of Energy guidance recommends typical vertical support intervals no greater than six feet. The duct manufacturer's instructions may impose additional requirements.
The support arrangement should maintain the duct's intended alignment. A long vertical section should not depend solely on one collar or drawband for support. Movement can gradually strain the connection and damage the liner.
Vertical ducts inside walls or dedicated chases may also need approved fireblocking and other building details. The supports must be compatible with the enclosure and should not damage the surrounding vapor barrier or insulation.
Can Flexible Ductwork Rest on Ceiling Joists?
Flexible ducts may rest on ceiling joists or other suitable support surfaces in some approved installations, according to Department of Energy guidance. However, they must still be adequately supported and protected against crushing or sagging. Simply laying a long branch across widely spaced framing does not automatically satisfy the support requirements.
A duct resting on a narrow framing edge can experience localized pressure. A suitable saddle or support board may be appropriate when permitted by the design. The inner liner should maintain its intended shape.
Attic-floor placement also needs to account for the insulation strategy and moisture conditions. In some climates, buried-duct arrangements require specialized details to avoid condensation. Ducts should not be covered with insulation indiscriminately.
Can You Hang Flexible Ductwork With Wire?
Thin wire should not be used as the sole support around an insulated flexible duct because it concentrates weight on a narrow contact area. The pressure can compress insulation or deform the inner liner. A duct may appear securely suspended while airflow is restricted at every wire loop.
Approved wide straps or saddles are preferable. If an existing narrow support is retained as part of a modified assembly, an appropriately sized saddle may be needed to distribute the load. The Department of Energy describes rigid saddle solutions for certain repairs involving narrow existing supports.
The completed arrangement should maintain the duct's intended diameter and provide suitable support spacing.
Can You Hang Flexible Ductwork With Zip Ties?
Cable ties are commonly used as approved mechanical drawbands for fastening certain flexible duct inner liners to rigid collars. That connection function is different from suspending the weight of the complete insulated duct. A narrow tie tightened directly around the duct jacket can compress the insulation and inner passage.
For hanging, use suitable wide supports or approved saddle systems. The fastener used to attach a support to framing should be compatible with the support manufacturer's instructions. Ordinary narrow zip ties are not a substitute for properly designed duct hangers.
A connection drawband and a hanging strap should be selected independently according to their different functions.
How Do You Support Flexible Ductwork Near a Vent?
The register boot should be securely attached to suitable supports. The flexible branch should then be supported near the boot so its weight does not pull against the connection. The duct should not make an abrupt unsupported turn immediately before entering the fitting.
A rigid elbow may be useful in some installations where the branch must change direction sharply near the boot. The Department of Energy discusses this approach as a way to reduce compression at difficult connections. The exact fitting should follow the duct design.
Check the inner-liner connection after installing the supports. A securely mounted boot does not prevent air leakage when the flexible liner remains loose.
How Do You Fix Sagging Flexible Ductwork?
Fixing a sagging duct begins with inspecting the material and determining whether it remains structurally sound. If the liner is intact and the duct is simply unsupported, additional hangers may restore an appropriate route. However, a severely crushed or torn section may need replacement.
A typical correction involves identifying the unsupported length, adjusting the duct position, and installing wide straps at suitable intervals. Excess duct length may also need to be shortened according to the approved connection method. The installer should not simply pull the branch tighter at one endpoint.
After the supports are installed, inspect the connection collars and insulation. Sagging can place stress on joints, so these areas may also need repair. Final airflow checks help confirm that the restriction has been corrected.
How Much Does It Cost to Hang Flexible Ductwork?
The cost depends on whether the work involves adding supports to sound existing ducts or installing new flexible branches. Rehanging an accessible duct can be relatively small compared with complete duct replacement. However, difficult attic or crawlspace access can increase labor.
A contractor may charge a minimum service fee for correcting one unsupported section. Larger projects involving many duct runs can require more straps, saddles, and installation time. The price may also increase if connections need repair or the duct material must be replaced.
A quote should explain whether the work involves support correction only or includes removing and reinstalling duct sections. The contractor should also identify any necessary air sealing or insulation repair. These details make it easier to compare the value of the proposed work.
Does Properly Hanging Flex Duct Improve Airflow?
Proper support can improve airflow when the existing duct has been restricted by sagging or compression. Restoring a smoother passage reduces unnecessary resistance. However, the benefit depends on the condition of the original installation and whether other restrictions remain.
An undersized duct cannot be corrected simply by adding hangers. A damaged blower, clogged filter, or restrictive return path can also affect airflow. The HVAC system should be evaluated when problems persist after the duct is supported correctly.
The Department of Energy emphasizes that proper flexible duct installation can reduce airflow losses and related energy waste. The actual result varies by the severity of the original defects.
What Mistakes Should You Avoid When Hanging Flex Duct?
Incorrect support methods can create problems as serious as leaving the duct unsupported. The most common errors involve narrow straps, excessive spacing, and sharp bends near connections.
Avoid these mistakes:
- Using narrow wire as the only hanger around the duct.
- Tightening cable ties around the full insulated diameter.
- Spacing horizontal supports farther apart than permitted.
- Allowing sag to exceed the recommended limit.
- Installing supports at inconsistent heights that create unnecessary loops.
- Failing to support bends.
- Allowing the duct to pull against a rigid collar.
- Hanging register boots or junction boxes from the flexible duct itself.
- Securing straps to unsupported ceiling drywall.
- Attaching hangers to plumbing or electrical conduits.
- Cutting structural framing to create a hanger location.
- Leaving the duct crushed against a joist.
- Failing to inspect the inner liner after repositioning.
- Damaging the vapor-barrier jacket.
- Allowing ducts to rest in crawlspace water.
- Hiding severe liner damage with additional support straps.
- Ignoring manufacturer requirements for vertical installations.
- Skipping airflow or leakage checks when significant repairs were made.
A correct hanging arrangement should support the duct without distorting it. The goal is a stable, appropriately extended passage with sound connections and intact insulation.
Should You Hire a Professional to Hang Flexible Ductwork?
Adding a support strap to a safely accessible duct may be a manageable repair for an experienced homeowner. However, extensive duct support corrections can involve attic or crawlspace hazards and may expose problems requiring duct replacement. A homeowner should not enter unsafe areas simply to complete a minor repair.
Professional help is appropriate when several branches are sagging or airflow problems are widespread. A qualified HVAC technician can determine whether the ducts are correctly sized and whether their connections remain airtight. Professional testing can also identify restrictions that are not visible from outside.
A contractor should explain whether the work involves new hangers, connection repairs, shortening excess duct, or replacing damaged sections. That distinction helps establish an appropriate repair budget.
How Can You Keep Flexible Ductwork Properly Supported?
Duct supports should remain in place throughout future attic and crawlspace work. Workers installing electrical wiring, plumbing, or insulation should avoid stepping on flexible branches or removing their hangers. Ducts should not be used as storage surfaces or temporary supports for other materials.
During routine HVAC maintenance, ask the technician to inspect accessible hanging straps and connections. Replace damaged supports promptly. An early repair may prevent the liner from becoming crushed or a collar from separating.
Maintain the exterior insulation and protective jacket. Moisture-damaged or torn materials should be evaluated before the condition worsens. Sound support and moisture protection help flexible ductwork remain serviceable over time.
Conclusion
Hanging flexible ductwork correctly requires wide support straps, appropriate spacing, limited sag, and extra support near bends and rigid connections. Department of Energy guidance generally recommends straps at least 1.5 inches wide, horizontal support spacing no greater than four feet, and sag limited to half an inch per foot. Vertical sections typically need support at intervals no greater than six feet. The support system must preserve the shape of the air passage without crushing its insulation or liner. Inspect connections and airflow after major hanging corrections to confirm that the ductwork remains secure and functional.